|
|
Communications Module Configuration Setup
Configuring ports on the Communications Module is done through the vr_debug_putty.py program.
The required changes include:
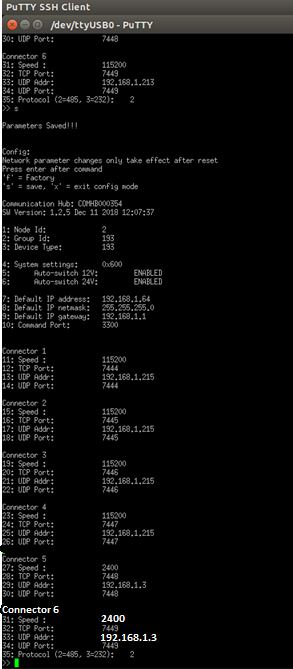
- Changing the Communications Module Port 6 Baud rate to 2400.
- Setting the destination address for the Cygnus UT gauge data to the IP address of the external computer running the CygLink software. This computer would be connected using an Ethernet cable from the Operator Control Console Ethernet port to the external computer.
Step by Step Configuration Procedures
The following steps show how to the configure Communications Port 6 for the Cygnus UT.
- Connect the system and power on the ROV, but do not start Greensea Workspace.
- If Greensea Workspace was running, reboot the Operator Control Console
- Open a Terminal window on the Operator Control Console.
- Type cd flighthack followed by the [Enter] key. Commands are case senstive.
- Type ./vr_debug_putty.py 2 followed by the [Enter] key. The VR debug window will open.
- If the VR debug window does not respond, close the window and try again.
- You might need to type the + several times immediately after typing the ./vr_debug_putty 2 command in order for the communications to synchronize.
- Type c in the VR debug window to enter the configuration mode.
- Typing a ? will display a list of all available option while in debug mode, including the configuration mode.
- For this example, we will use Port 6.
 Make a note of the current settings displayed for Port 6, so you can revert back to them if necessary for when you are not using the Cygnus UT gauge. Make a note of the current settings displayed for Port 6, so you can revert back to them if necessary for when you are not using the Cygnus UT gauge.
- To make the changes required to support the Cygnus UT:
- Type 31 followed by the [Enter] key to indicate you want to change parameter 31.
- Type 2400 followed by the [Enter] key to specify the new value for parameter 31.
- Type 33 followed by the [Enter] key.
- Type 192.168.1.3 followed by the [Enter] key.
- You should see the Port 6 settings as shown below. (highlighted at the bottom)

- Press the s key followed by the [Enter] key to save the configuration.
- Press the x key followed by the [Enter] key to exit the configuration menu.
- Press the x key again to exit diagnostic mode. You do not need to press [Enter].
- Close the diagnostic window.
- Close the terminal window.
The Communications Module Port 6 is now configure as required for the Cygnus UT gauge.
|


