|
|
VideoRay Virtual Training Library
, 1.00.00 |
|
|
VideoRay Virtual Training Library
, 1.00.00 |
Copyright NoticeThis material is copyright protected. No material may be reproduced or transmitted in any form or by any means for any purpose without expressed written consent of VideoRay LLC. Copyright © 2022, VideoRay LLC - The Global Leader in Micro-ROV Technology |
|
|
VideoRay Virtual Training Library
, 1.00.00 |
|
|
VideoRay Virtual Training Library
, 1.00.00 |
About this DocumentOnline ManualThis printed Quick Start Guide is a subset of the full version of this manual, which is available on the VideoRay Virtual Training Library control panel and online in the following formats:
Document ConventionsSeveral symbols are used throughout this documentation to add emphasis and to assist in relocating important information. The following table describes these symbols and their uses.
Beyond this DocumentThere is no substitute for experience and/or training, especially with respect to the real purpose for which you plan to use this equipment. We encourage you to explore options beyond the scope of these materials to expand your knowledge and skills necessary to support your applications. In addition to this documentation, VideoRay offers training and technical support and hosts a general user discussion forum and user image gallery. We also realize that collectively, users of our products spend considerably more time operating our systems than we do ourselves. Users also encounter more diverse operating environments across an extremely broad range of applications. We highly value this vast experience base, and invite and encourage you to share your experiences and suggestions with us. Please feel free to contact us by any of the methods listed below. Quality CommitmentVideoRay strives to design, manufacture, deliver and support the highest quality products and services, including this documentation. We have made every effort to ensure that this documentation is accurate and provides you with the most up-to-date information. If you find any errors in this documentation or have suggestions for improvements, each page contains a "Help us improve this document" feedback link in the left margin (you must be connected to the Internet to use this link).
DisclaimerThis document is deemed accurate at the time of its writing, however it is not a legal contract and the information contained herein should not be construed to represent any form of commitment. This document as well as the associated products and services are subject to change without notice. |
|
|
VideoRay Virtual Training Library
, 1.00.00 |
How to Get HelpHelp for your VideoRay Virtual Training Library is available through several channels. All Hours Self-Service / Crowd-Source Tools
Global Support
Regional Support
Training
Operational Strategies and Tactics SupportIf you need help understanding how to apply your system to a specific project, contact VideoRay or you local VideoRay dealer. We can provide guidance or help you find a certified consultant. |
Before Contacting SupportPlease make sure to consider the following information before contacting VideoRay's Technical Support to report a problem. The following information should available:
Once you have collected the recommended information, visit the "How to Get Help" page for contact information. In addition, please review VideoRay's Support website for additional information about:
|
|
|
VideoRay Virtual Training Library
, 1.00.00 |
Welcome to the VideoRay Training LibraryThe VideoRay Training Library includes a series of Virtual Training Lessons about VideoRay ROV systems and related products, but it is more than just an index and access point to this material. The Library also includes Knowledge and Skill Competencies and Curricula to guide you through the learning experience. We recommend that you start with the How to Use these Lessons Feel free to browse the Library to find additional topics of interest. |
How to Use these LessonsLesson Description
|
Additional Educational ResourcesTechnical DocumentationIn-Person Training Opportunities |
|
|
VideoRay Virtual Training Library
, 1.00.00 |
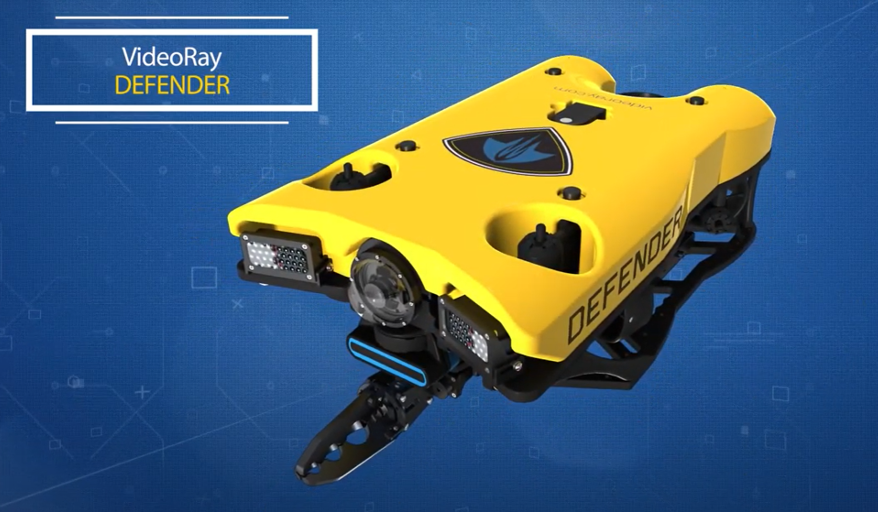
Introduction to VideoRay Mission Specialist CompetenciesThe ROV Basic Operator Certificate is like a vehicle driver's license. It is conferred upon successful completion training and demonstration of a core set of knowledge and skills related to the safe and effective operation of a specific ROV system. Unlike a general driver's license, however, the ROV Operator Certificates require an endorsement for each ROV model, accessory and operating control software (similar to a motorcycle endorsement or CDL). This is in recognition of the significant differences of ROV and sensor designs and operating capabilities and limitations. In addition to the type of system, the ROV Basic Operator Certificate recognizes additional achievements based on the recorded number of hours of operation in various roles, including Pilot, Tether Handler, Accessory Operations, Maintenance and Supervision. Operating hours and continuing education activities are required for this certificate to remain in effect. Upon successful completion of this syllabus, the following endorsements are applicable: Mission Specialist Defender
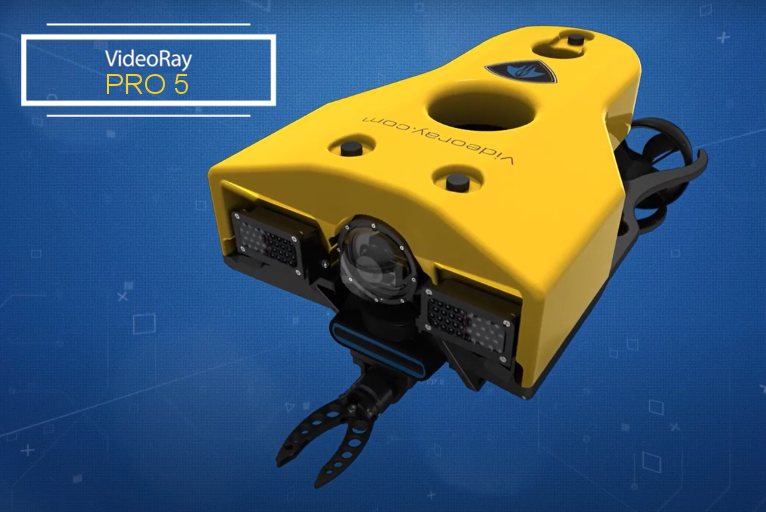
Mission Specialist Pro 5
The following pages include a checkbox list of knowledge and operating proficiencies required to achieve the designation of ROV Basic Operator with endorsements as noted above. The core requirements are presented in normal and bold font. Requirements that are not essential for everyday operations or that are considered advanced topics are presented in italics. A log book for recording hours of operation is provided after the knowledge and operating proficiencies. |
Knowledge RequirementsKnowledge Requirements are defined as specific items of information or data that an operator would be expected know. There are 5 categories of Knowledge Requirements: |
Knowledge Requirement 1:VideoRay Defender Component IdentificationOperators should be able to identify each component of the ROV system and explain its function/purpose. For any component that is configurable (for example, Ballast), be able to describe what factors affect the selection of the proper configuration and in what ways. For any component that has a display (for example, LIM), be able to describe the meaning of the information displayed and any actions to be taken as indicated by the information. For any component used for input (for example, hand controller), be able to explain the input and expected response to such input.
|
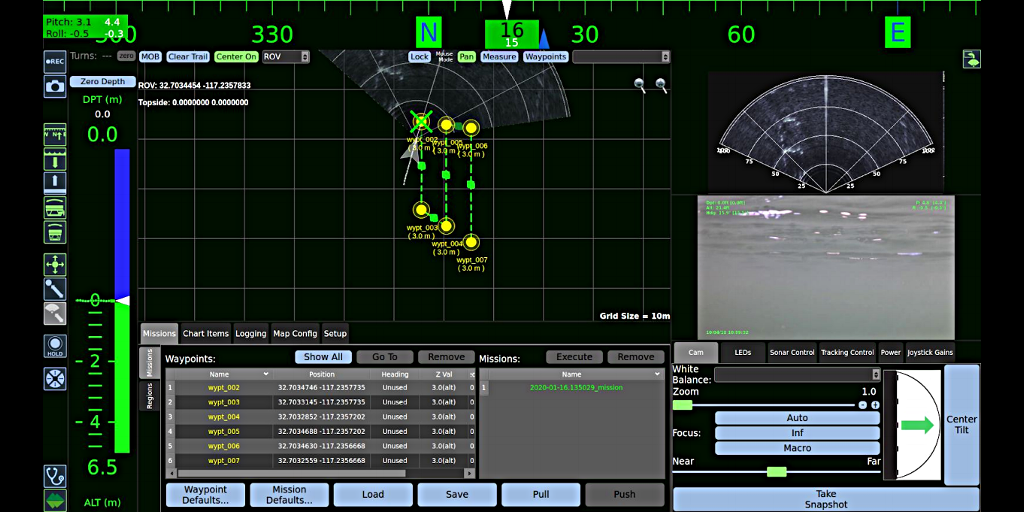
Knowledge Requirement 2:Greensea EOD Workspace Interface and OperationOperators should be able to launch and navigate the control software interface. This includes finding, identifying the purpose of and operation of each interface element. Interface ElementsIn the following list of knowledge requirements, interface elements are identified using the following naming conventions:
Visual Conventions:
|
Knowledge Requirement 3:Project PlanningOperators should be able to plan all aspects of a mission. Operators should be aware of ROV crew roles and responsibilities. Operators should be able to identify risks and apply appropriate risk mitigation strategies.
|
Knowledge Requirement 4:
|
Knowledge Requirement 5:Diagnostic Information and DisplaysOperators should know where to find diagnostic Information and be able to use the information to help isolate problems and possibly determine the cause and resolution of problems.
|
Skill ProficienciesSkill Proficiencies are defined as specific activities that an operator would be expected to be able to perform. There are 3 categories of Skill Profciencies: |
Proficiency Requirement 1:Computer FundamentalsOperators should be able to use a computer to perform general purpose operations like starting programs, copying files, managing disk space and connecting to a network.
|
Proficiency Requirement 2:Operational TacticsOperators should be able to control the ROV manually and using the autonomous piloting features. This includes all phases of an operation from initial setup and launch through retrieve and storage. The operator's objective is usually to complete a task - piloting the ROV needs to be a secondary and instinctive process so that the operator can focus on accomplishing the primary objectives. Operators should not be distracted by having to search the interface to find a feature or not taking advantage of the tools that can make the tasks easier.
|
Proficiency Requirement 3:Field Maintenance and RepairsOperators should be able to maintain the ROV system in a operationally ready state. Operators should also be able to troubleshoot basic problems and be capable of replacing modules in the field in order to prevent a simple to fix problem from causing the mission to be aborted.
|
|
|
VideoRay Virtual Training Library
, 1.00.00 |
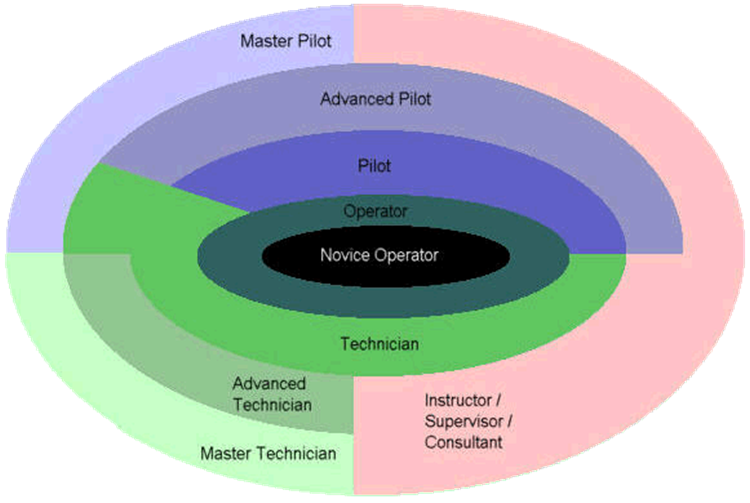
CurriculaWhile each Video Training Lesson in this library can be viewed independently, some topics build on knowledge learned in other lessons. These lessons can be grouped and sequenced into curricula for various roles including Operators and Technicians. Within each of these roles there is a progression of competencies from Novice through Advanced. While training provides a foundation for building your competencies and advancing your career, experience plays a large role in achieving the higher level competencies. The following diagram represents the increasing knowledge and skills learned as one progresses from Novice (in the center) through advanced levels. It is like an onion that grows outwards in Layers. Notice that as you progress outward, there is a tendency to specialize, so that, for example, a general operator can choose to focus their advancement in piloting or a maintenance and repairs career path. At the most advanced levels around the outside, there is a need to give back to the community through mentoring and contributing to the knowledge base through presentations and publications. Career Path "Onion"
The curricula on the following pages are available to help guide you though the lessons in a sensible order to help you get the most value from your learning experience. |
Mission Specialist Operator CurriculaThe following curricula are available for operators: |
Mission Specialist Defender Operator CurriculumThe following sequence of lessons is recommended for learning how to use the VideoRay Mission Specialist Defender. Novice Operator (100 Level Series)
Basic Operator (200 Level Series)
Advanced Operator (300 Level Series)
|
Mission Specialist Pro 5 Operator CurriculumThe following sequence of lessons is recommended for learning how to use the VideoRay Mission Specialist Pro 5. Novice Operator (100 Level Series)
Basic Operator 200 Level Lessons
|
Pro 4 Operator CurriculumThe success of our customers is directly proportionate to the quality of instruction they receive when they take delivery of their system. Better training translates into a higher mission success rate, fewer catastrophic "incidents", and an overall better product experience. And, as expected, some training is better than no training at all. Pro 4 Basic Operator Training VideosSince there is no such thing as too much training and we realize not all customers can attend training in person, VideoRay has produced a series of very basic instructional videos. Topics in this Playlist
If there are additional topics you would like to learn, please This email address is being protected from spambots. You need JavaScript enabled to view it. ! VIDEORAY BASIC INSTRUCTIONAL VIDEOS (Click on "Playlist" to select desired video) |
Mission Specialist Technician CurriculaThe following curricula is available for technicians: |
Mission Specialist TechnicianThe following sequence of lessons is recommended for learning how to maintain, diagnose and repair Mission Specialist Systems and accessories. Basic Technician (100 Level Series)
Basic Technician (200 Level Series)
Advanced Technician (300 Level Series)
|
Pro 4 Technician CurriculumThe Pro 4 Advanced Maintenance in-person training is recommended for learning how to maintain, diagnose and repair Mission Specialist Systems and accessories. For those unable to attend in person training, the Pro 4 Maintenance Manual is available for viewing online within the VideoRay Educational Resources Library. |
|
|
VideoRay Virtual Training Library
, 1.00.00 |
Virtual Training Lesson LibraryThis section of the VideoRay Training Library includes direct access to individual lessons. Feel free to browse this library to find topics that might be interest you. If you want to learn about a specific ROV system, we recommend you follow one or more of the curricula that have been designed to step you through the lessons sequentially in a logical order of progression, with new lessons building upon the knowledge learn in previous lessons. |
Mission SpecialistMission Specialist lessons include: |
General LessonsThe following lessons are of general interest to the ROV community. |
This section contains a link to: https://www.youtube.com/embed/79UpkLnPG_k?autoplay=1
Safety FirstLesson Description
|
Mission Specialist Standards of Equipment Care and HandlingLesson Description
|
Mission Specialist Defender Lessons & ExercisesThe following lessons are specific to the Mission Specialist Defender.
|
Mission Specialist Defender Operator LessonsThe following lessons are for people who own or operate the Mission Specialist Defender. |
Mission Specialist Defender System OverviewLesson Description
|
Mission Specialist Defender IP65 Hand Controller MappingLesson Description
|
Mission Specialist Defender Xbox Elite Hand Controller MappingLesson Description
|
Mission Specialist Defender Quick Start InstructionsLesson Description
|
Mission Specialist Defender Camera and LED LightsLesson Description
|
Mission Specialist Defender Using Auto ModesLesson Description
|
Mission Specialist Defender Dynamic Positioning and Jog ControlsLesson Description
|
Defender Module Overviews |
Mission Specialist Module Overview Thruster ModuleLesson Description
|
Mission Specialist Defender Propeller InformationLesson Description
|
Mission Specialist Defender Replacement Instructions: Thruster ModuleLesson Description
|
Mission Specialist Thruster Oil Refill InstructionsLesson Description
|
Mission Specialist Defender Accessory LessonsThe following lessons are for people who plan to operate accessories with the Mission Specialist Defender. |
Operating the Blueprint Subsea Oculus Sonar on the Mission Specialist DefenderLesson Description
|
Mission Specialist Defender Technician LessonsThe following lessons are for technicians who plan to diagnose and repair the Mission Specialist Defender. |
Mission Specialist Defender Periodic MaintenanceLesson Description
|
Module ReplacementThis section includes lessons about how to remove and replace modules. |
Mission Specialist Defender Propeller InformationLesson Description
|
Mission Specialist Defender Replacement Instructions: Thruster ModuleLesson Description
|
Mission Specialist Thruster Oil Refill InstructionsLesson Description
|
Mission Specialist Defender ExercisesThe following exercises are specific to the Mission Specialist Defender. |
Mission Specialist Defender Manual Control ExercisesLesson Description
|
|
|
This section is a subtopic header and containts no content.
|
|
This section is a subtopic header and containts no content.
|
|
This section is a subtopic header and containts no content.
|
|
This section is a subtopic header and containts no content.
|
|
This section is a subtopic header and containts no content.
Mission Specialist Pro 5 Lessons & ExercisesThe following lessons are specific to the Mission Specialist Pro 5.
|
Mission Specialist Pro 5 Operator LessonsThe following lessons are for people who own or operate the Mission Specialist Pro 5. |
Mission Specialist Pro 5 System OverviewLesson Description
|
Mission Specialist Pro 5 IP65 Hand Controller MappingLesson Description
|
Mission Specialist Pro 5 Quick Start InstructionsLesson Description
|
Mission Specialist Pro 5 Camera and LED LightsLesson Description
|
Mission Specialist Pro 5 Using Auto ModesLesson Description
|
Mission Specialist Pro 5 Accessory LessonsThe following lessons are for people who plan to operate accessories with the Mission Specialist Pro 5. |
Operating the Blueprint Subsea Oculus Sonar on the Mission Specialist Pro 5Lesson Description
|
Mission Specialist Pro 5 Technician LessonsThe following lessons are for technicians who plan to diagnose and repair the Mission Specialist Pro 5. |
Mission Specialist Pro 5 Periodic MaintenanceLesson Description
|
Mission Specialist Pro 5 ExercisesThe following exercises are specific to the Mission Specialist Pro 5. |
|
|
This section is a subtopic header and containts no content.
|
|
This section is a subtopic header and containts no content.
|
|
This section is a subtopic header and containts no content.
|
|
This section is a subtopic header and containts no content.
Diagnostics and Repairs LessonsThe following lessons are for technicians who plan to diagnose and repair the Mission Specialist systems. |
|
|
This section is a subtopic header and containts no content.
|
|
This section is a subtopic header and containts no content.
|
|
This section is a subtopic header and containts no content.
|
|
Greensea Workspace LessonsThe following lessons are specific to the Greensea Workspace.
|
Greensea Workspace OverviewLesson Description
|
Pro 4 LessonsPro 4 lessons include: |
Pro 4 Operator CurriculumThe success of our customers is directly proportionate to the quality of instruction they receive when they take delivery of their system. Better training translates into a higher mission success rate, fewer catastrophic "incidents", and an overall better product experience. And, as expected, some training is better than no training at all. Pro 4 Basic Operator Training VideosSince there is no such thing as too much training and we realize not all customers can attend training in person, VideoRay has produced a series of very basic instructional videos. Topics in this Playlist
If there are additional topics you would like to learn, please This email address is being protected from spambots. You need JavaScript enabled to view it. ! VIDEORAY BASIC INSTRUCTIONAL VIDEOS (Click on "Playlist" to select desired video) |
Pro 4 Technician CurriculumThe Pro 4 Advanced Maintenance in-person training is recommended for learning how to maintain, diagnose and repair Mission Specialist Systems and accessories. For those unable to attend in person training, the Pro 4 Maintenance Manual is available for viewing online within the VideoRay Educational Resources Library. |
Sensors and ToolingThe following lessons provide information about the various accessories that are available for Mission Specialist systems. |
Accessory Technology Primers |
Multibeam Sonar IntroductionLesson Description
|
Blueprint Lab LessonsThe following lessons are specific to products from Blueprint Lab. |
Coming SoonThis lesson is in development. Please check back here for updates. For immediate assistance about this topic, contact VideoRay Support. |
Blueprint Subsea LessonsThe following lessons are specific to products from Blueprint Subsea. |
Oculus Sonar |
Operating the Blueprint Subsea Oculus Sonar on the Mission Specialist DefenderLesson Description
|
Seatrac USBL |
Coming SoonThis lesson is in development. Please check back here for updates. For immediate assistance about this topic, contact VideoRay Support. |
Eddyfi Inuktun LessonsThe following lessons are specific to products from Eddyfi Inuktun. |
Coming SoonThis lesson is in development. Please check back here for updates. For immediate assistance about this topic, contact VideoRay Support. |
Nortek LessonsThe following lessons are specific to products from Nortek. |
Coming SoonThis lesson is in development. Please check back here for updates. For immediate assistance about this topic, contact VideoRay Support. |
VideoRay Sensors Lessons |
Coming SoonThis lesson is in development. Please check back here for updates. For immediate assistance about this topic, contact VideoRay Support. |
Alphabetical List of LessonsABCDDefender Exercises - Auto Modes Defender Exercises - Dynamic Positioning and Jog Controls Defender Exercises - Manual Control Defender Hand Controller Mapping - IP65 Defender Hand Controller Mapping - Xbox Elite Defender Quick Start Instructions Defender Removal and Replacement Instructions: Thruster Propeller Defender Removal and Replacement Instructions: Thruster Module Defender - Using the Auto Modes Defender - Using the Blueprint Subsea Oculus Sonar Defender - Using the Camera and LED Lights Defender - Using the Dynamic Positioning and Jog Controls Diagnostic Principles EFGHIIntroduction to Multibeam Sonar JKLMMission Specialist Thruster Module Overview and Procedures Mission Specialist Thruster Oil Refill Instructions NOPPro 5 Exercises - Auto Modes Pro 5 Exercises - Manual Control Pro 5 Hand Controller Mapping - IP65 Pro 5 Quick Start Instructions Pro 5 - Using the Blueprint Subsea Oculus Sonar Pro 5 - Using the Camera and LED Lights Pro 4 Introduction to Basic Operator Training Videos QRSTUVWXYZ |