Mission Specialist Pro 5
Manual Control Exercises
Version:  A-1.00.00

Page 1 of 24
Overview

Overview

Welcome to the real world of underwater operations! This lesson is your first introduction to field operations and actually piloting a Pro 5. The focus is familiarization with the equipment, software and how the system performs under manual control. It is similar to your first time driving a car and getting used to how quickly the steering, acceleration and brakes respond to your inputs.

We recommend that you thoroughly review this lesson in an office environment before going into the field. You can print this lesson using the print icon in the upper left or copy it to the operator control console or personal computer so that you can have it available while you practice the exercises.

Make sure you have completed all of the Recommended Prerequisites before attempting this lesson.

And, VideoRay's Support Team is always available to assist should you need us.

Mission Specialist Pro 5
Manual Control Exercises
Version:  A-1.00.00

Page 2 of 24
Tether Management

[ This page contains a video when viewed online. This image is a preview. ]

Tether Management

The success of many missions and the general welfare of the system rely on good tether management practices. This includes knowledge of the concerns and tether handling skills. In this section, we will look at the various methods of handling tether and best practices to employ during operations.

Methods for handling the tether include using a reel or TDS, which stands for Tether Deployment System, coiling the tether using the figure eight method, which can be free form or on a frame, over-under coiling, and in some cases unspooling the tether and laying it on the deck may be an appropriate technique for some applications.

Mission Specialist Pro 5
Manual Control Exercises
Version:  A-1.00.00

Page 3 of 24
TDS - Tether Deployment System

TDS - Tether Deployment System

The TDS or Tether Deployment System is an efficient tool for transporting tether. The nicest thing about using a TDS is that it does not introduce twists in the tether while using it. It does have its drawbacks because the case adds more weight and space than the tether alone, and for the constant unspooling and respooling of tether during operations, it may be easier to manage the tether by hand coiling techniques that we will look at next.

There are a couple of dos and don'ts when using a TDS:

Dos

  • Pull the tether off the reel and use the crank to rewind it.
  • Use a rag to clean the tether as you rewind it.
  • Rinse the case out when necessary.

Don'ts

  • Do not drop the case. The tether is heavy and its momentum on impact can damage the reel or bearings and slip ring.
  • Do not pinch the tether when closing the lid.
  • Make sure the deck cable is not in contact with the reel. The reel can wear through the tether jacket if the cable is in contact with it.
  • Do not unwind the tether using the hand crank. This will cause the tether to "bird's nest" or tangle.
  • When cleaning, do not use a powerful spray of water clean near the slip ring.

Mission Specialist Pro 5
Manual Control Exercises
Version:  A-1.00.00

Page 4 of 24
Figure Eight Coiling

Figure Eight Coiling

For this exercise, if you are starting with a tether that you just uncoiled, start at the male connector (the end the will be attached to the operator control console). if you are using a TDS or a previously used tether that has been properly coiled using either of the preferred methods mentioned, pay out at least 20 meters (65 feet) and start near the TDS or coil.

As seen here, the tether is laid in a figure eight pattern. One loop of the figure 8 introduces a twist in one direction and the other loop introduces a twist in the opposite direction canceling out the first.

Begin at a point about 3 meters (10 Feet) from the male end, TDS or coil. Pull tether so the free end comes toward you and initiate a coil in a clockwise direction. When the loop is complete, create another loop next to the first loop in the counterclockwise direction. The loops should be about the same size and the starting direction really does not matter as long as you alternate directions for each loop. When the second loop is complete, you should have two equal loops side by side, or a figure eight. The size of the loops depends on the type and amount of tether you plan to deploy. Larger diameter and longer tethers should be coiled in larger loops. See the picture for an example of an appropriately sized figure eight coil based on tether type and length. Repeat this pattern alternating clockwise and counterclockwise loops side by side until you come to the end of the tether.

Now, have someone else pull the free end out for about 10 meters (30 feet) and while they are doing so, ensure that the tether unspools from the figure eight without pulling more than one loop at a time. The easiest way to do this is to hold the tether loosely above the center of the figure eight and allow it to be pulled through your hands and straight up off of the figure eight. Once the tether is paid out again, recoil the tether using the figure eight method again.

The reason for repeating this is to simulate what you will actually be doing during a job. As the tether handler, you are responsible for providing the pilot with enough tether to maneuver, but not too much to allow tangles to develop. You will likely be coiling and uncoiling the tether many times during a job. Even if you are using a TDS you may find it easier to manage the tether using figure eight or over / under coils rather than to constantly unwind and rewind the TDS.

Mission Specialist Pro 5
Manual Control Exercises
Version:  A-1.00.00

Page 5 of 24
Over Under Coiling

Over Under Coiling

The over / under coiling technique is more compact than the figure eight and can be used when deck space is limited. For this exercise, begin the same way you started the figure eight exercise.

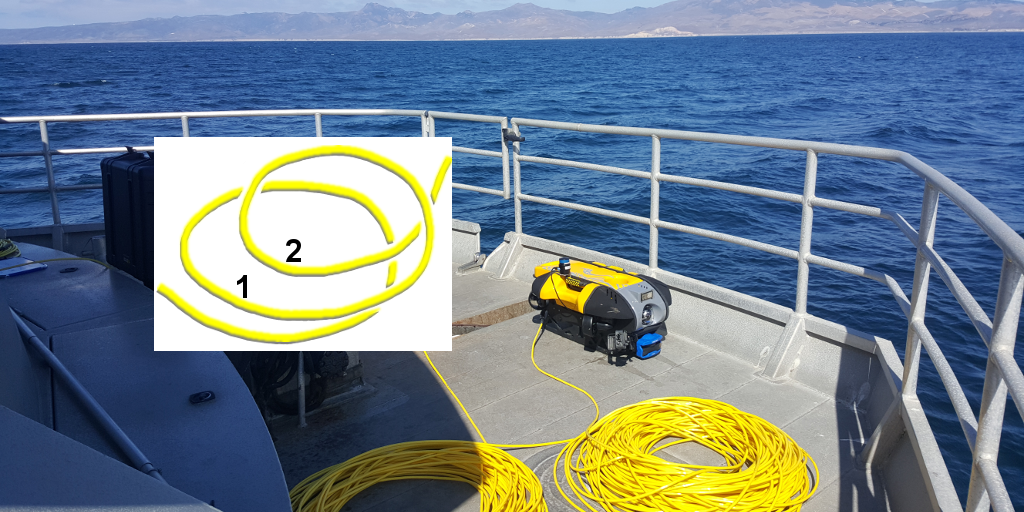
As seen here, one loop is laid on top as normal, but the next loop is fed under rather than over to create the loop. This has the same effect as the figure eight method and each loop cancels the twist from the previous loop.

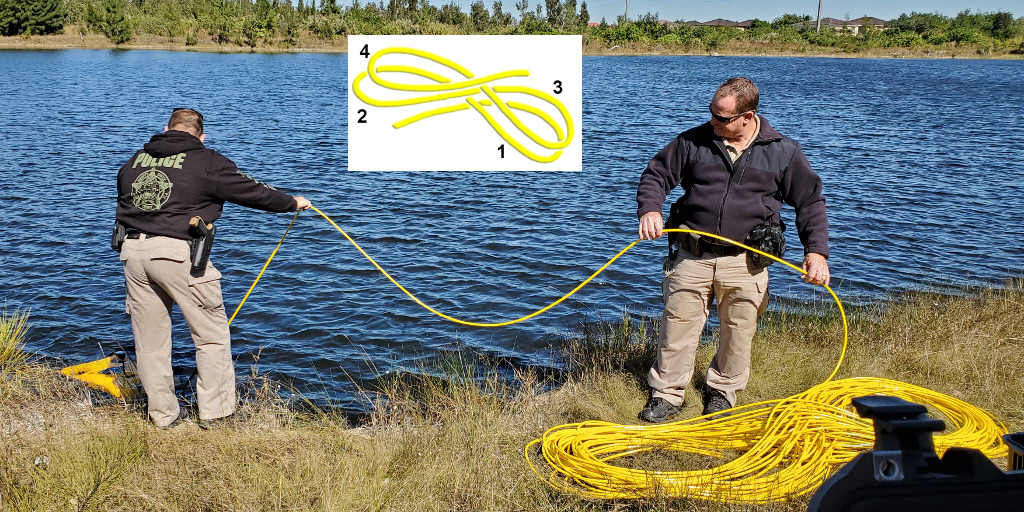
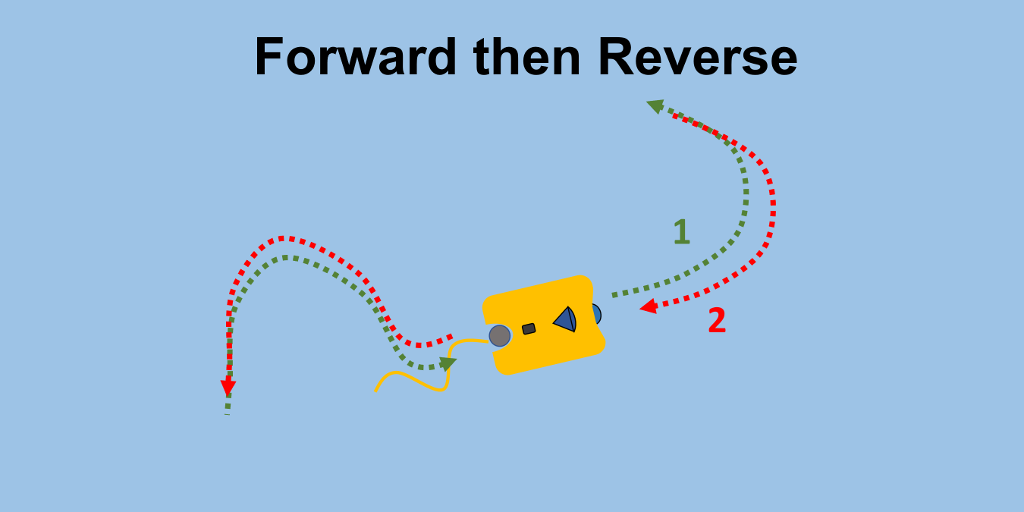
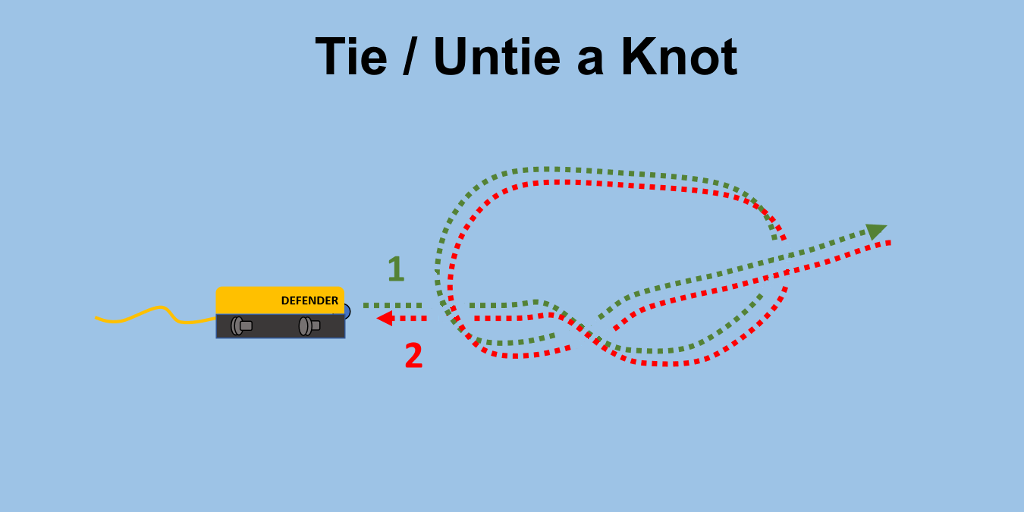
There are several ways to approach this and you may prefer one way or the other if you are left or right handed. For the sake of explaining the motions, we will describe one way and you can reverse it if it feel more comfortable doing it the other way. It is best to use this coiling technique while on your knees with the planned coil location in front of you and we will assume that the free end of the tether is to your right. Start by reaching out to your right with your right hand palm down with your thumb towards you and grab the tether about arm's length away. Now, without rotating your hand, lift the tether and make a horizontal circular sweeping motion, out and across in front of you and then back towards yourself to form a counterclockwise loop of tether. You may feel the tether try to twist - allow it to do so. You should have a loop that starts from your left and goes counterclockwise and crosses over the tether and exits to your right as seen for loop 1 in the figure. This is the "over" loop. To make the "under" loop, grab the free end of the "over" loop where it crosses with your left hand and lift it up slightly. Once again using your right hand, reach out to your right and grab the tether the same way as previously. This time, instead of a sweeping motion, bring your right hand directly toward your left while rolling your right hand to your right and left your hand to your left, as if you were turning your palms in an up. Keep your right hand lower than your left hand. This motion should force the tether into an "under" loop as seen in loop 2 in the figure. Repeat these steps to continue to coil the tether. Try to make sure the loops are about the same size. After a while you will develop a rhythm that feels comfortable.

As with the figure eight exercise, have someone else uncoil some tether and repeat the process to get comfortable with feeding tether out and recoiling as you are likely to be doing during a dive.

If you look at the drawing, you might have noticed that the crossing points for each loop are close together. If they all cross at the same point, you will end up with a lopsided pile of loops. As an advanced variation of this method, you should try to stagger the crossings around the loop instead of all in one spot.

Mission Specialist Pro 5
Manual Control Exercises
Version:  A-1.00.00

Page 6 of 24
Tether Connections

Tether Connections

Tether connections are the weak link in the power and communications required by the ROV. Each connection should be checked for corrosion or debris and lubricated with a silicone based grease before mating. The strain relief is critical to carry the load. Without the strain relief, the connections are likely to separate and if it is not installed properly, the connection can fail. Make sure that after the strain relief is connected there is no load on the connection when the tether is tugged in different directions.

Mission Specialist Pro 5
Manual Control Exercises
Version:  A-1.00.00

Page 7 of 24
Managing Tether

Managing Tether

While operating, the tether handler's job is to ensure the safety of the tether and that its impact on piloting the ROV is minimal. This usually means that the tether will be deployed and retrieved many times during a job. As seen here, even with a TDS, it is easy to manage the tether using one of the previously described hand coiling methods. Usually, the tether will simply be deployed as fast as necessary while the ROV is navigated to the area of operation, and then while the ROV conducts its mission the tether will need to be managed. When the project work has been completed, the tether will need to be retrieved. If the pilot is flying the ROV back, the tether should not be pulled too quickly to impact the piloting. If the operating site is deep, sometimes it might be better to apply vertical up thrust and haul the ROV up by the tether.

Mission Specialist Pro 5
Manual Control Exercises
Version:  A-1.00.00

Page 8 of 24
Piloting Skills Development

Piloting Skills Development

Use the VideoRay Training Library Pro 5 Quick Start lesson as a reference to perform a pre-dive inspection and set up the system before starting these exercises. If you need a refresher on the hand controller functions, use the cross reference links for the controller of your choice.

Start these exercises by watching the ROV, but as you progress and build your skills you should focus more on watching the video display.

Usually, you will be working with someone else. Three people per system is a good starting point. One person can pilot, the second manage the tether and the third be an observer to watch the time, take notes and provide a post dive critique. Each person should rotate though all three roles.

Mission Specialist Pro 5
Manual Control Exercises
Version:  A-1.00.00

Page 9 of 24
Vehicle Handling Characteristics

Vehicle Handling Characteristics

This first piloting exercise is designed you help you get familiar with the controls and responsiveness of the vehicle.

After making sure everything is ready to go after your pre-dive inspection, or remedied if not, launch the vehicle. This can be done by slowly lowering the vehicle into the water by its tether. Before piloting away from the deployment point, get your bearings or ask your tether handler for assistance. Navigate the vehicle slowly into an open area.

For this exercise, the goal is not to accomplish anything other than getting familiar with how the vehicle responds to your input. Maneuver in all directions getting familiar with the response to the joystick and depth control knob. Keep the vehicle in the open so you do not accidentally run into anything.

While piloting, someone should be managing the tether.

Mission Specialist Pro 5
Manual Control Exercises
Version:  A-1.00.00

Page 10 of 24
Drive a Box

Drive a Box

We will now proceed to go through a series of exercises designed to advance your ability to control the vehicle more accurately and precisely. As you progress through these exercises, begin to rely more and more on the camera rather than watching the ROV directly and start to exercise the camera controls to learn how to use the tilt and focus.

In this exercise, try to maintain straight lines and right angle turns as you "drive the box." The distances for each side should be at least 5 - 10 meters (15- 30 feet) depending on how large your work area allows. For this and upcoming exercises, repeat each activity at least 5 times, or more if time allows. You should begin to note improvements from your first repetition through your last.

This exercise also helps you get familiar with the effect of the tether on the vehicle. You may not notice it as much in a pool, but when pulling more tether or in swift current, the effect of the tether on the vehicle handling will be greater.

Mission Specialist Pro 5
Manual Control Exercises
Version:  A-1.00.00

Page 11 of 24
Follow a Horizontal Feature

Follow a Horizontal Feature

Now that you have mastered some basic flight in open areas, we will turn our attention to precise handling in the vicinity of and relative to other objects. In addition to more focus on the camera controls, you should introduce video recording and snapshots as part of each exercise.

In this exercise, the goal is to learn to follow a horizontal feature. You can use a pool lane marking or stay alongside the edge of the pool. As shown, repeat this using three different flight modes: straight ahead, laterally, and crabbing, and for each you should navigate in both directions. For straight ahead and crabbing, you should reverse direction by operating in reverse, not by turning around. Again, do 5 or more repetitions of each mode.

Your goal is to improve your ability to follow the line as closely as possible and at a constant speed, but you should increase your speed in the later repetitions as you begin to get comfortable with the controls. For the lateral movement, try to maintain a fixed distance and remain perpendicular to the line as best as possible.

Mission Specialist Pro 5
Manual Control Exercises
Version:  A-1.00.00

Page 12 of 24
Follow a Vertical Feature

Follow a Vertical Feature

Similar to the previous exercise, the goal of this exercise is to follow a linear feature, but this time vertically. Again, the goals is to maintain a constant distance, orientation and speed. One difference here is that the camera tilt is significantly more important. You should tilt your camera so you are always looking ahead in the direction of travel. Tilt the camera up and down as appropriate.

Mission Specialist Pro 5
Manual Control Exercises
Version:  A-1.00.00

Page 13 of 24
Hold Station

Hold Station

In this exercise, you will try to position the ROV and maintain it at that location. Navigate the ROV along a pool wall and then turn toward the wall while on the way to observe a point such as a pool filter inlet, outlet or light. Tether "recoil" will tend to pull the ROV in the direction from where you started and yaw the vehicle. Your goal is to overcome that force to keep the vehicle in position. If tether recoil is strong, which it can be for a new tether, you might need to pass the point of interest and then reverse back to the point. This will add some slack to the tether so that it does not tend to recoil as much. You can alternatively ask the tether handler to deploy more tether in these situations. Remember, there is usually more than just one "right" way to pilot for a given situation. The more "tricks" you learn, the better you will be able to handle any situation.

Mission Specialist Pro 5
Manual Control Exercises
Version:  A-1.00.00

Page 14 of 24
Maintain a Heading

Maintain a Heading

So far the piloting has been visual. Let's switch to instrument flying. Select a heading that will not intersect obstructions for an extended course. Navigate along the heading monitoring the compass without observing the ROV or the video display. You can block the lower portion of the operator control console display. Try to maintain a heading and have an observer evaluate your performance. Similar to the "drive a box" exercise, you should repeat this at different headings to introduce tether pull at different angles to the flight path.

Mission Specialist Pro 5
Manual Control Exercises
Version:  A-1.00.00

Page 15 of 24
Estimating Turns

Estimating Turns

For this exercise, go to the bottom where you have a visual reference. Observe the heading. While watching the display only, turn an estimated 90 degrees and then check your result. After at least 5 repetitions, hopefully with some improvement, move to more open water and repeat. You can be fooled into thinking you are turning more by the water flow introduced by the horizontal thrusters, which tends to sweep water and particles past the camera and make the ROV look like it is turning faster or farther than it really is.

Mission Specialist Pro 5
Manual Control Exercises
Version:  A-1.00.00

Page 16 of 24
Find and Follow Your Tether

Find and Follow Your Tether

For this exercise, the goal is to find and follow your tether. This is one of the most critical skills an ROV pilot needs to master. It can mean the difference between recovering your ROV or having to leave it behind if you get the tether stuck on or around something.

Navigate away from your deployment point about 30 meters (90 feet) or as much as space will allow. Turn the ROV to look for and find your tether. If you do not immediately see it, look straight ahead and turn, then look up and turn and finally look down and turn. If you still do not find it, repeat the search process until you do. When turning, do not turn in one direction more than 360 degrees so you do not put unnecessary turns in the tether. If you are sure the tether is not stuck on something, you can have the tether handler put a little tension on it and that might help you find it.

While following your tether, you should try to get and keep the camera as close as possible to the tether. The most likely time you will find yourself stuck or wrapped around something is when the visibility is low, so you will need to be good at following the tether close enough to keep in constantly in view. You may also find that the tether will lay in the water in a helix shape from being stored in a coil. In this situation you may be required to tilt your camera up and down as you go to maintain visual contact with the tether.

Mission Specialist Pro 5
Manual Control Exercises
Version:  A-1.00.00

Page 17 of 24
Forward then Reverse

Forward then Reverse

This exercise will help you with navigation and visual recollection. Fly a semi-random course and then without turning around, try to reverse the ROV through the course. You may need this skill to back out of a tight spot.

Mission Specialist Pro 5
Manual Control Exercises
Version:  A-1.00.00

Page 18 of 24
Penetrate an Opening

Penetrate an Opening

For this exercise, you will need something like a hula hoop, weight and float. Tie the weight and float to the hula hoop so that when placed in the water, the hoop will be suspended in the water column. If you have manipulator you can use it to retrieve the hoop. If you don't have a manipulator, you should add an additional lead so you can retrieve the hoop from the shore.

While navigating, try to penetrate an opening without hitting it with the ROV. Practice going forward in, turning around and forward out, as well as forward in and reversing out, and finally, reversing in and forward out.

Mission Specialist Pro 5
Manual Control Exercises
Version:  A-1.00.00

Page 19 of 24
Orbit an Object

Orbit an Object

This is probably the most demanding exercise you will attempt, but by now, you should feel pretty comfortable that you can control the ROV with precision and skill. Select a point of reference, such as a mark or drain on the bottom of the pool and try to circle the reference point. Maintain a constant distance and adjust your heading to face the object the whole time while you orbit it. Orbit in both directions. If your system includes a DVL, you will find the Pro 5 with Greensea Systems software can do the maneuver with ease and very high precision to create a near perfect circle while always facing directly toward the reference point.

Mission Specialist Pro 5
Manual Control Exercises
Version:  A-1.00.00

Page 20 of 24
Tie / Untie a Knot

Tie / Untie a Knot

This is another challenging exercise, especially if the pool is shallow. Try to tie a knot in your tether by making a loop, crossing over your tether and then going down through the loop. You can also try going under and coming up through the loop depending on how the tether is floating in the water. You may need to dive and pull some tether deeper since it will likely tend to float slightly. Once you have tied a knot, try to untie it by reversing your course.

Once you master tying a knot, you can try to simulate a stuck and tangled tether. A pool chair or something similar can be used as the basis for getting the tether wrapped around something, and the challenge is to untangle the tether and free the ROV.

If you have groups, a fun challenge is to have one group try to tangle the ROV and then the second group needs to untangle it. You can make this competitive by timing the event for each group or just for fun.

Mission Specialist Pro 5
Manual Control Exercises
Version:  A-1.00.00

Page 21 of 24
Manipulator Skills Development

Manipulator Skills Development

One of the most common accessories for ROVs is a manipulator. If you have a manipulator, the following exercises will help you learn to use it effectively.

Mission Specialist Pro 5
Manual Control Exercises
Version:  A-1.00.00

Page 22 of 24
Manipulator Retrieval

Manipulator Retrieval

Deploy an object and use the manipulator to retrieve it and bring it to the surface. Even though we show it in this image, We don't recommend you use your car keys or anything else you don't want to lose, especially if working in open water and not in a pool. Use the manipulator extension angle, ROV pitch control and manipulator rotation to optimize the orientation of the manipulator for grasping your object. Once you have grasped the object, press the manipulator close button a few times to tighten the grip. Bring the object to the surface to recover it. As usual, repeat this several times.

Here are some manipulator / recovery tips:

  • While trying to grasp a small movable objects, try not thrust backwards quickly - the thrust may push the object and it could end up somewhere where it is harder to grasp. Practicing with a golf ball is a great skill builder since the golf ball will tend to roll away while trying to grasp it. At least you have more potential for success than a cat trying to catch a laser dot.
  • Water is much denser than air. Once you have grabbed an object, do not try to make quick or sudden maneuvers. When you turn fast or fly fast, the drag force may dislodge the object.

  • When you reach the surface, use a net under the ROV and coordinate your release with the person grabbing the object, so you don't lose it to the depths again.
  • If you lift the ROV out of the water with the object in the manipulator, remember the object is probably much heaver in air and may slip out of the jaws.
  • If you can get a secure grip, such as through a loop in the object, the better. Some people have modified the jaws to include sharp pointed screws to also ensure a more secure grasp.

Mission Specialist Pro 5
Manual Control Exercises
Version:  A-1.00.00

Page 23 of 24
Manipulator Placement

Manipulator Placement

Sometimes, you many need to place an object. An example might be retrieving several objects from a small area. Rather than navigating each object to the surface, it may make more sense to deploy a collection basket.

After you have mastered placement in a large container, like a bucket. Practice placing the object in smaller and smaller containers. Or practice placing an object on top of something, again using smaller and smaller platforms to make it more challenging.

Mission Specialist Pro 5
Manual Control Exercises
Version:  A-1.00.00

Page 24 of 24
Tether Manipulation

Tether Manipulation

In addition to being able to retrieve objects, the manipulator may be a pilot's second best friend after the tether handler. In some situations when the tether is stuck or wrapped around something, you may not be able to unstick it by piloting alone.

In this exercise, use the manipulator to "manage" the tether. Ideally, you can find something to wrap the tether around and then rather than navigating the ROV to clear the wrap or tangle, use the manipulator to do so. If you don't have something to wrap the tether around, you can practice for this scenario by tying a semi-tight knot in the tether (do not exceed the tether's minimum bend radius of about 75 mm (3 inches)). Use the manipulator to try to loosen the knot.

.