


Auto Heading
Auto Heading can be used to maintain an existing Heading, or turn the ROV to a specified Heading. Auto Heading is designed to be as seamless as possible so that you can pilot without having to constantly engage and disengage it when alternating between holding a course and changing directions.
How Auto Heading Works
When Auto Heading is engaged, the ROV will automatically respond to changes in heading (measured by the compass) by applying horizontal thrust to maintain the current heading. If the Auto Heading Indicator is moved to a new heading, the ROV will automatically respond by applying horizontal thrust until the heading of the ROV matches the heading indicated by the Auto Heading Indicator.
![]() See the Compass section in the VideoRay Cockpit Guide for information about the Compass.
See the Compass section in the VideoRay Cockpit Guide for information about the Compass.
Using Auto Heading to Hold a Heading
To hold the current Heading, center the joystick and click and drag the Auto Heading Indicator on the Compass to the current heading. The Auto Heading Indicator should change from gray to green and the text from "Auto Off" to "Auto On." The ROV will hold the current heading. You can apply forward or backward thrust to move in the direction of the heading. To turn to a new heading while Auto Heading is engaged, displace the joystick laterally to apply thrust in the desired direction. You do not need to disengage Auto Heading, and when you center the joystick, Auto Heading will take over and maintain the new heading.
| Auto Heading Indicator Display | |
|---|---|
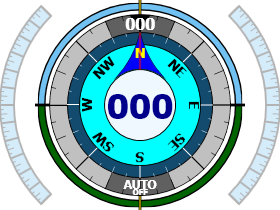
|
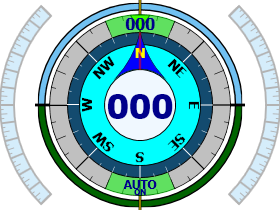
|
| Auto Heading Off | Auto Heading Engaged |
Using Auto Heading to Automatically Turn to a Heading
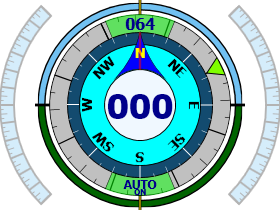
To rotate the ROV to a specified heading, center the joystick and click and drag the Auto Heading Indicator to the desired heading. The Auto Heading Indicator should change from black to green and the text from "Auto Off" to "Auto On." The ROV will turn to the heading. Note that the heading to which you want to turn is displayed in the Auto Heading Indicator at the top of the compass. You can override the Auto Heading to pilot the ROV manually by used the joystick. When you center the joystick, Auto Heading will take over and turn the ROV to the specified heading.
Using Auto Heading to Turn to a Specified Heading
Disengaging Auto Heading
While the joystick is displaced laterally from its center position, Auto Heading will temporarily suspend itself until the joystick is centered again. The Auto Heading indicator will change from green to gray and display the word "Manual" to indicate that the heading is being controlled manually.
To disengage Auto Heading completely, click on the Auto Heading Indicator. The Auto Heading Indicator turns from green to gray when Auto Heading is disengaged.
![]() For most operations, you can engage Auto Heading and leave it engaged, because it will hold the ROV at the heading you want, but you can manually override Auto Heading to turn to a new heading without having to disengage it.
For most operations, you can engage Auto Heading and leave it engaged, because it will hold the ROV at the heading you want, but you can manually override Auto Heading to turn to a new heading without having to disengage it.


