Control Sensitivity
The Control Sensitivity Instrument allows you to adjust how responsive the ROV is to joystick and depth control inputs.
The sensitivity is determined by the values of control gains, which range from 1% to 100%. The control input applied by the operator is multiplied by the gain before being sent to the ROV as a command to drive the thrusters. A gain setting of 100% and maximum control input will result in the thrusters operating at full available power. If the gain is reduced, the same maximum control input will result in correspondingly less thruster power. Lower gain settings allow the operator to have more precise control over the vehicle at the expense not having the maximum power available. For example, new users may find it easier to pilot the ROV using lower gain settings until they get used to the handling characteristics of the vehicle.
The gain settings can be adjusted at any time according to the piloting requirements.
Display
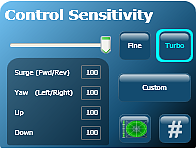
 Text Input Mode |
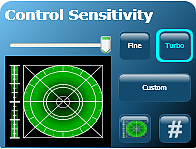
 Visual Input Mode |
Use
You can independently control the sensitivity of the following control parameters:
- Surge (forward and backward motion, usually mapped to the joystick forward and back motion)
- Yaw (turning motion usually mapped to the joystick left and right motion)
- Vertical Up (usually mapped to the depth control knob)
- Vertical Down (usually mapped to the depth control knob)
![]() The Pro 4 is a very responsive vehicle. New users may find it easier to learn how to pilot the ROV by decreasing the Yaw gain.
The Pro 4 is a very responsive vehicle. New users may find it easier to learn how to pilot the ROV by decreasing the Yaw gain.
There are two ways to set the sensitivity, numerically or visually. In addition you can save three favorite settings for recall.
Adjusting the Sensitivity Numerically
To adjust the control sensitivity numerically, click on the number (#) button in the lower right hand corner of the control sensitivity instrument. The left hand side of the instrument will list the control parameters and display input fields for the gains. You can enter a number from 1 to 100 in each of the input fields. You can also move the slider above the text input area to decrease or increase all of the numbers uniformly. Moving the slider to the left decreases the gains and moving it to the right increases gains.
Adjusting the Sensitivity Visually
To adjust the control sensitivity visually, click on the graph button in the lower right hand corner of the control sensitivity instrument. The left hand side of the instrument will display a vertical bar on the left for Vertical Up and Down gains, and a polar grid area on the right for the Surge and Yaw gains. The green shaded region in both areas gives a visual indication of the gain settings. Left click and drag the vertical bar to set the Vertical gain symmetrically for up and down. Right click and drag to set the up and down gain independently. The top of the bar is for Vertical Up thrust and the bottom for Vertical Down thrust. Likewise, left click and drag in the polar region to set the Surge gain (indicated by the top and bottom values) and Yaw gain (indicated by the left and right values). When you left click and drag, the gains are adjusted symmetrically as indicated by the circular green shaded area. Right click and drag in the polar region to adjust the Surge independent of the Yaw. The top and bottom of the polar area are for Surge and the left and right are for Yaw. You can also move the slider above the graph area to decrease or increase all of the gain settings uniformly. Moving the slider to the left decreases the gains and moving it to the right increases the gains.
For the surge and Yaw, when clicking and dragging with the left button, the gains are set to the radius of the circle at the point of release. When clicking and dragging with the right button, the gains are set to the major and minor axes radii of an ellipse. The point of release defines a bounding rectangle of the ellipse.
![]() The forward gain cannot be set independently of the reverse gain, and the left gain cannot be set independently of the right gain.
The forward gain cannot be set independently of the reverse gain, and the left gain cannot be set independently of the right gain.
Saving Favorite Settings for Recall
The Control Sensitivity Instrument also has three buttons for quickly setting the gains to preset or saved values. By default, "Fine" sets the all of the gains to 50%, and "Turbo" and "Custom" set all of the gains to 100%. Click on a button to activate the gain settings associated with it. The border of the button will turn blue to indicate its settings are active. If you make manual changes to the gains, the border will turn yellow to indicate the gains no longer match its stored settings. You can change the saved values for any of the buttons. To program a button with new values, manually adjust the gain settings to the desired values. Click and hold on the desired button until the border around the button turns blue. The current settings will be associated with that button and can be recalled at any time by clicking on the button. Repeat this process to associate new gain settings with any button at any time.
Sizing the Control Sensitivity Instrument
The size and display of the Control Sensitivity can be adjusted. See the Instruments section of this guide for more information.


